Aisho Dainenjiyama (大年寺山 愛唱 Dainenjiyama Aishō) is a minor antagonist featured in JoJolion.
Aisho is a Rock Human working as a security guard who secretly belongs to the Rokakaka Smuggling Organization as a dealer. When Yasuho Hirose and Tsurugi Higashikata tail him in order to investigate the Rokakaka, he unleashes his Stand, Doobie Wah!, on them.
Appearance
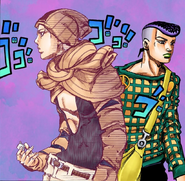
Aisho is a slender man of average to below average height. His usual outfit is composed of a skin-tight black bodysuit with a hole in the chest, khaki shorts with a belt, and what appears to be layered sleeves tied around his neck. He also wears what appears to be a pair of sleeves wrapped around his head, allowing some of his hair to poke out through the holes.
Personality
Aisho is very nervous and paranoid most of the time. When he is upset, he tends to overreact to small things, such as a group of birds in the park. He is also easily frightened and intimidated by enemies he can not see. He can get so worried that he will briefly experience flashbacks to previous traumatic times/experiences. He is also noted to have been less capable of controlling his rock physiology, and may very well still be. This is evident in his inability to wake up for at least a month every time he falls asleep. It is a combination of this fact and his naivete that led him to misplace his trust in a previous lover which culminated in her cheating on him and selling his house while he slept in his rock form.
It seems to be implied that Dainenjiyama has some sort of heart condition, as he is commonly shown with several 'Doki Doki' sound effects (a Japanese word that refers to the sound of a beating heart) around his person. This is reinforced later when he is shown taking pills for his heart.[2]
Abilities
Stand
- Main article: Doobie Wah!
Aisho's Stand Doobie Wah! is able to create miniature tornadoes that automatically pursue its targets; it is capable of cutting flesh using the tornadoes' bases.
He seems to be able to track or follow his Stand, as he uses it to locate Yasuho and Tsurugi just as it was about to kill them.[3] This Stand is incredibly powerful, almost impossible to avoid or negate without ceasing to breathe entirely.
Synopsis
The Man with the Fruit
In the past, Aisho owned a house and property in the countryside which his girlfriend would frequent during his periods of consciousness. During one such occasion, overcome with love and trust for this woman, he confided in her his secret and the conditions that caused him to disappear for a month at a time, thinking that she could be relied upon.[3]
Due to this mistake, after waking up from his next sleep cycle he was shocked to find that his house was being demolished. His friend Yotsuyu Yagiyama rescued him and explained to him the situation; his girlfriend had not only cheated on him while he slept, but had also stolen the deed to his land and sold it to property developers so she could disappear with the money.
Aisho eventually came to be employed at the stadium that Yotsuyu designed, presumably using it as a base of operations to house the mysterious fruits when he wasn't selling them for profit. While secretly importing the fruits from Port Moresby to Morioh, Aisho was discovered by Yoshikage Kira while in rock form after the crate he was hiding in was damaged. Kira and Josefumi Kujo would then proceed to stalk him and at some point, steal a Rokakaka branch from him without.
He is first introduced into the story being viewed via Paisley Park interfacing with the security footage of Jobin being handed the mysterious fruit at a red light by Aisho. Yasuho proceeds to use her abilities to track his movements back to the stadium where he works and she theorizes that he must be keeping the trees which grow the fruits there.
Through the combined powers of Paisley Park and Paper Moon King, they are able to follow him by shaping a phone into one of Tsurugi's living origami. After witnessing Aisho delivering the fruit to an elderly wheelchair ridden man they observe it's restorative abilities first-hand; regenerating the man's lost leg while simultaneously performing 'equivalent exchange' by rendering him blind, although he rationalizes this by saying he can always buy another fruit to restore his sight and perpetuate the cycle.
Aisho soon realizes he is being followed and stomps on the origami, causing proportionate damage to both Yasuho and Tsurugi, and if not for Tsurugi's Paper Moon King making Aisho incapable of differentiating between the living origami and the surrounding foliage, their combined Stands would have not escaped. Distraught at the revelation that multiple Stand-users appear to be following him, Aisho promptly attempts to get in contact with Yotsuyu only to become more distressed when he finds that his number is out of service. Fearful that unidentified parties might have done something to his friend, he activates and sets his Stand Doobie Wah! on his trackers in hopes of killing them swiftly.
While his automatic Stand pursues the two of them Aisho tracks Doobie Wah!'s movement while contacting Jobin Higashikata to inquire about Yotsuyu's status and to see if he is in any way involved in these occurrences. Satisfied that Jobin is telling the truth, he converges on Yasuho and Tsurugi's location after the pair have had several near-fatal encounters with his Stand and confronts the two on their motives.
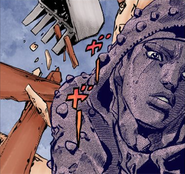
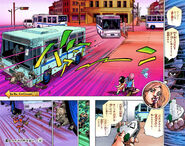
No sooner than he discovers the identity of one of his stalkers to be that of Tsurugi Higashikata, Jobin's son, does Jobin himself arrive on the scene. Aisho quickly turns to question Jobin about his involvement in this conspiracy and to force him to consent to Aisho killing Tsurugi as a means of assuring his sincerity. However he is too late to discover that Jobin's figure is none other than the distorted image of an approaching bus and that he has been under the effects of Tsurugi's Stand this entire time. This revelation comes too late, however, and he is struck by the bus and killed,[3] at which point his body shatters into rock and is scattered across the street.
Gallery
References
- ↑ 1.0 1.1 JJL Chapter 39: Doobie Wah (1)
- ↑ JJL Chapter 40: Doobie Wah (2)
- ↑ 3.0 3.1 3.2 JJL Chapter 42: Doobie Wah (4)


